
Introduction
Stone veneer installation has become a popular choice for homeowners and designers looking to enhance the aesthetics of their spaces. Whether used indoors or outdoors, stone veneer offers a natural and timeless look that can transform any surface into a work of art. In this comprehensive guide, we will explore the various aspects of stone veneer installation, including the benefits, types of stone veneer, installation process, maintenance, and cost considerations.
Benefits of Stone Veneer Installation
1. Aesthetics: One of the primary reasons for choosing stone veneer is its aesthetic appeal. Stone veneer adds a touch of elegance and sophistication to any space, creating a warm and inviting atmosphere.
2. Durability: Stone veneer is highly durable and can withstand the elements, making it ideal for both indoor and outdoor use. It is resistant to mold, mildew, and rot, ensuring that your investment will last for years to come.
3. Versatility: Stone veneer comes in a wide range of colors, textures, and styles, allowing you to customize the look of your space to suit your preferences. Whether you prefer a rustic, traditional, or modern aesthetic, there is a stone veneer option to match your style.
4. Cost-Effective: Stone veneer is a cost-effective alternative to natural stone, offering the same aesthetic appeal at a fraction of the cost. It is also lightweight, which can help reduce installation costs.
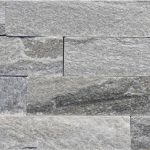
Types of Stone Veneer
1. Natural Stone Veneer: Natural stone veneer is made from real stone that is cut into thin slices. It offers the authentic look and feel of natural stone, with variations in color and texture that add to its beauty. Natural stone veneer is available in a variety of options, including granite, limestone, slate, and more.
2. Manufactured Stone Veneer: Manufactured stone veneer, also known as faux stone, is made from a blend of Portland cement, aggregates, and iron oxides. It is designed to mimic the look of natural stone and is available in a wide range of colors and textures. Manufactured stone veneer is lightweight and easy to install, making it a popular choice for DIY projects.
3. Brick Veneer: Brick veneer is another type of stone veneer that is made from real clay bricks cut into thin slices. It offers the classic look of traditional brick without the need for a full masonry installation. Brick veneer is available in a variety of colors and styles, allowing you to achieve the desired aesthetic for your space.
Installation Process
1. Surface Preparation: Before installing stone veneer, it is essential to prepare the surface properly. This may involve cleaning the surface, applying a waterproof barrier, and installing a metal lath to provide a secure base for the veneer.
2. Mixing Mortar: To adhere the stone veneer to the surface, you will need to mix mortar according to the manufacturer's instructions. The mortar should have the right consistency to ensure proper adhesion.
3. Applying Mortar: Using a trowel, apply a layer of mortar to the back of the stone veneer and press it firmly onto the surface. Make sure to leave a small gap between the stones for grout.
4. Grouting: Once the stone veneer is installed, fill the gaps between the stones with grout. Use a grout bag or trowel to apply the grout evenly and remove any excess.
5. Sealing: To protect the stone veneer and enhance its longevity, consider applying a sealant after the installation is complete. The sealant will help prevent moisture penetration and keep the veneer looking its best.
Maintenance
To ensure the longevity and beauty of your stone veneer, it is essential to perform regular maintenance. Here are some tips to help you keep your stone veneer looking its best:
1. Clean regularly: Use a mild detergent and water to clean the surface of the stone veneer. Avoid using harsh chemicals or abrasive cleaners, as they can damage the veneer.
2. Inspect for damage: Periodically inspect the stone veneer for any signs of damage, such as cracks or loose stones. Repair any damage promptly to prevent further issues.
3. Seal as needed: Depending on the type of stone veneer you have installed, you may need to reapply a sealant periodically to protect the surface from moisture and stains.
4. Avoid impact: Stone veneer is durable but can be damaged by heavy impact. Avoid hitting or dropping objects on the veneer to prevent cracks or chips.
Cost Considerations
The cost of stone veneer installation can vary depending on various factors, including the type of stone veneer, the size of the project, and the complexity of the installation. Here are some cost considerations to keep in mind:
1. Type of stone veneer: Natural stone veneer is typically more expensive than manufactured stone veneer or brick veneer. Consider your budget and aesthetic preferences when choosing the type of stone veneer for your project.
2. Installation labor: If you choose to hire a professional contractor to install the stone veneer, labor costs will be a significant portion of the total project cost. Get Natural ledge stone for landscaping from reputable contractors to ensure you are getting a fair price.
3. Project size: The size of the project will also impact the cost of stone veneer installation. Larger projects will require more materials and labor, resulting in higher overall costs.
4. Additional materials: In addition to the stone veneer itself, you may need to purchase other materials such as mortar, grout, sealant, and tools. Factor these costs into your budget to avoid any surprises.
Conclusion
Stone veneer installation is a versatile and cost-effective way to enhance the aesthetics of your space. Whether you choose natural stone veneer, manufactured stone veneer, or brick veneer, the result will be a beautiful and durable surface that adds value to your home. By following the installation process, performing regular maintenance, and considering cost considerations, you can achieve a stunning stone veneer installation that will stand the test of time.